The POS screen
The POS (Point of Sale) screen is your checkout counter. It's where you add products to a basket, take the customer's money, give change and print their receipt — all in a few seconds.
/cashier.Screen layout & tools
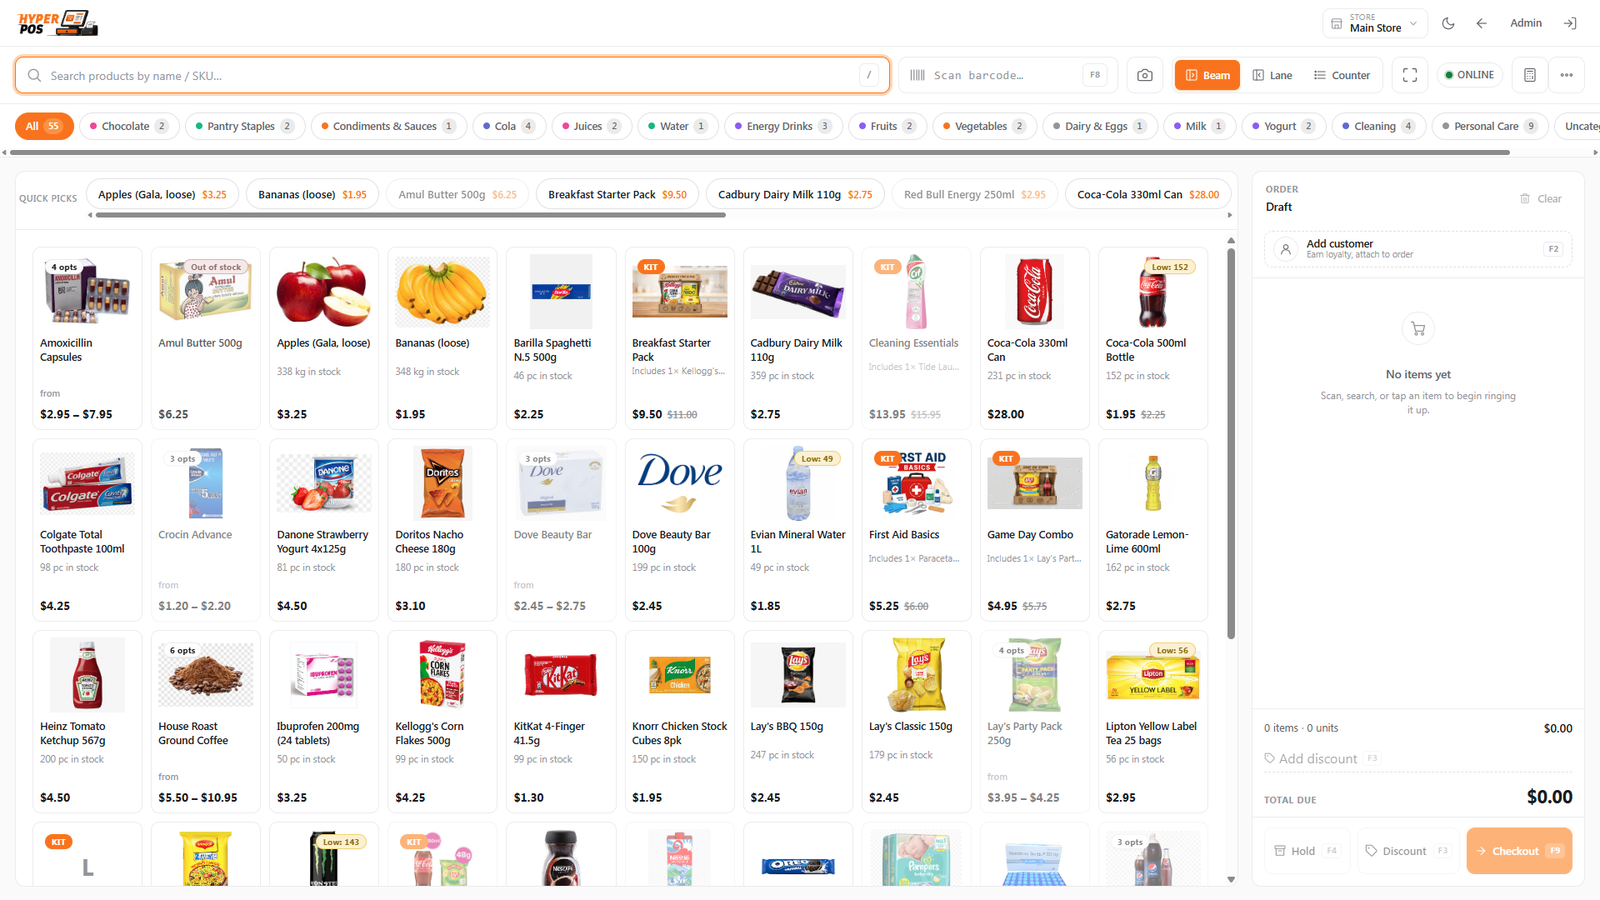
The POS screen adapts to your counter setup. Use the layout buttons in the top bar to switch between Beam (wide product grid), Lane (list + grid), and Counter (compact tiles). Product tile size can be changed with the S / M / L chips above the catalog.
- Search / scan box — type a product name, SKU, or barcode and press Enter. USB barcode scanners type into this field automatically. Press / or F8 to jump here from anywhere on the screen.
- Scan — open the camera barcode scanner (supported browsers only). Shortcut: F7.
- Calc — open the built-in calculator for quantities, discounts, tendered cash, and weights. Shortcut: F6.
- Sound on / off — optional beep when an item is added to the cart.
- Category sidebar — filter the catalog by category without leaving the sale.
- More menu — customer display, recent sales, reprint last receipt, X-Report, refunds, close shift, keyboard shortcuts, and fullscreen.
- Store switcher — if you have access to more than one branch, pick the active store from the header dropdown.
- Online / Offline — the status pill shows connectivity and queued offline sales. Tap it to sync manually or install the POS as an app.
Large catalogs load in pages — scroll or tap Load more products instead of waiting for every item up front. Search always queries the server for matches.
Press ? (or open More → Keyboard shortcuts) for the full shortcut list.
Overview
When you open the POS screen, you'll see your products on the right (as tappable tiles) and the current customer's basket — called the cart — on the left. You add items to the cart, the system adds up the total including tax, the customer pays, and you're done. A receipt prints automatically if you have a printer connected.
The screen is built to be fast. You can run an entire sale using just a barcode scanner and the cash drawer — no mouse needed.
Why it's useful
- It's quick. Scan-to-cart is near-instant, so queues move fast even at busy times.
- It does the maths for you. Totals, tax and change are calculated automatically — no mental arithmetic, no mistakes.
- It keeps records. Every sale is saved, so your reports, stock counts and customer balances stay accurate without extra work.
- It works offline. If your internet drops, you can keep selling — see Selling offline.
How to make a sale, step by step
-
Open the POS screen
Click POS in the left sidebar. If your shop uses shifts, you may be asked to open a shift and enter your starting cash first.
-
Add products to the cart
There are three ways to add an item, use whichever is fastest:
- Scan its barcode with a barcode scanner — it drops into the cart instantly.
- Tap the product tile on the right.
- Type a name or code in the search box at the top and pick from the list.
-
Adjust quantities if needed
In the cart, use the + and − buttons to change how many of an item the customer is buying, or type the number directly. To remove a line, click the small × next to it.
-
Add a customer (optional)
If the customer has an account or wants to buy on credit, click Add customer and search for them. This is required for credit sales. See Customers.
-
Apply a discount (optional)
You can reduce the price of a single line or the whole basket. See Discounts & pricing for the details.
-
Take the payment
Click the big Pay button (or press F9). Choose how the customer is paying — cash, card, UPI, or a mix. For cash, type the amount handed over and the screen shows the change to give. Use + Split tender to pay across several methods on one sale. For UPI with a saved VPA, tap Show UPI QR so the customer can scan a local QR code. For Razorpay/Stripe, use Charge via QR when online. See Taking payments.
-
Finish & print the receipt
Confirm the payment. The sale is saved, the cash drawer pops open (if connected), and the receipt prints. The cart clears, ready for the next customer.
Most sales are just scan → Pay → done. Everything else on this page is for the less common situations.
Other things you can do here
Shift, reports & receipts
If your shop uses shifts, open one when prompted (count the starting cash in the drawer). During the shift, open More → X-Report for a mid-shift cash summary without closing. When you finish, choose More → Close shift, count the cash in the drawer, and confirm — the system compares it to the expected total. Reprint last and Recent sales help when a customer needs another copy of a receipt. See Shifts & cash drawer.
If your administrator allows it, you may choose Sell without a shift when opening — useful for a quick sale, but those totals will not appear on shift reports until you open a shift.
Customer-facing display
Open More → Customer display on a second screen or tablet. It mirrors the cart total in real time while you ring up the sale. See Customer display.
Hold a sale and come back to it
If a customer forgets their wallet or needs to grab one more item, you don't have to cancel. Click Hold to park the basket safely, serve the next person, then reopen the held sale to finish it.
Weighed items
For products sold by weight (like fruit or loose grains), the system asks for the weight or reads it from a scale barcode. See Weighed & scale items.
Refunds from the counter
To give money back for a previous sale, open the More → Refund menu, then search by invoice number or product SKU. Pick the sale, choose quantities and a refund method, and post the return. Full details on the Returns & refunds page.
Tips & best practices
- Let the scanner do the work. A USB barcode scanner is far faster and more accurate than tapping tiles — it types into the search box for you. Use the camera scanner only when a handheld scanner is not available.
- Learn the keyboard shortcuts. F9 opens Pay, F4 holds the sale, and / focuses search — most of a busy shift can run without the mouse.
- Keep the cash you actually take honest. When paying by cash, type the real amount the customer hands you so the change and your end-of-day count are correct.
- Use Hold instead of cancelling. It keeps the queue moving and avoids re-scanning everything.
- Add the customer before paying if it's a credit sale — you can't switch a finished cash sale to credit afterwards.
Notes & warnings
A walk-in (no customer) sale must be fully paid before you can finish it. Only sales attached to a saved customer can be left partly unpaid (on credit).
Check the change on screen before opening the drawer in your head. The displayed change amount is always correct — trust it over manual calculation.
Related: Taking payments · Customer display · Returns & refunds · Shifts & cash drawer · Selling offline